Out of a curiousity to figure out how to improve detail on models without bloating the polygon count of the geometry, I took a closer look at displacement maps. I was surprised to find that Maya and Lightwave use displacement maps in fundamentally different ways.
First, I created a simple image in Photoshop to use as my displacement map (left). My goal was to apply the image to the face of a cube, rendering the pattern as new geometry.
Next, I created a cube in Lightwave’s Modeler with a UV map assigned to one face. After loading the model in Layout, I assigned the displacement map image to the UV map in the object properties (pull up the object properties, go to the “Deform” tab, and apply the texture to the “Displacment Map” texture button). When I rendered the object, the only difference was that the face with the map applied was pushed 1 meter in the direction of the displacement axis.
Suspecting the problem, I reopened the object in Modeler and subdivided the displacement face a few times to create more vertices. When I rendered that new geometry out with the displacement map applied, you can roughly see the displacement map, but with a lot of distortion and odd bending of polygons.
It turns out that Lightwave only applies displacement maps to existing vertices on the geometry. In order to get a more accurate representation of the displacement map, I would need to add more polygons to the face that will receive the displacement map. Since I wanted to use displacement maps to reduce the geometry of the base model, this defeats my purpose for using them.
Maya takes a different approach to displacement maps. I can apply a displacement map by adding it to the shader network for the material assigned to the face that I want to deform. First, I load the image file as an image node in Hypershade. Then I connect the alphaOut (or any of the individual colorOut values, since it’s a greyscale image) to a Multiply/Divide node (to control the strength of the deformation). Finally, I connect the output of that node to the “displacementMap” input of a surface (note: you can middle-mouse-drag the multiply/divide to the surface and choose “displacementMap”, or you can manually setup a “Displacement Map” node that connects to the surface’s Shader Group node — the first method is a shortcut for the second, but the shader network will look identical either way).
Now that the material is ready, I just assign it to a single polygon and render out the results. As you can see, Maya turned that single polygon into a much more complex piece of geometry during the render. The precision can be controlled using values in the “Displacement Map” section of the object properties (higher sample rates == higher precision). But even with high precision, you will still get some distortion and banding of the original image in the final render if you get too close to the object.
So it seems that displacement maps are great in Maya for smaller detail work that does not require close-up shots of the displacement. There are some other neat tricks I found using Maya at this short tutorial, including using temporary geometry in Maya to bake displacement maps and how to get ambient occlusion to work with the displaced geometry.
I stumbled onto this cool video from Keith Lango’s blog. It shows how you can use built-in features of Lightwave to render an object to look like it was painted, instead of getting a photo-realistic effect. Very creative!
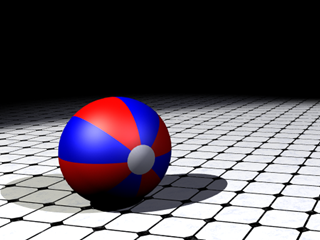
I created this video a couple of weeks ago and I have been meaning to post it up for a while but… I guess I’ve been busy. Or lazy. Take your pick, either one may be true.
Anyway, it’s been a while since I used LightWave so I decided to create the classic “bouncing ball” animation to quickly reacquaint myself with the keyboard shortcuts and general workflow in the program. Luckily, I have a copy of “Learning LightWave 9.0” handy for looking up a few basic things I completely forgot (like how to parent an object to another).
One thing I realized this time around: the procedural textures built into LightWave are very limited and difficult to work with. I played around with Maya a bit and created some interesting surfaces using the built-in textures. Maya spoiled me, because each procedural texture has its own set of custom controls that let you change the way the texture looks. For instance, the “marble” texture of Maya let’s you choose how much marbling is in the texture as a percentage. The equivalent texture in LightWave does not have nearly as much flexibility.
In this specific case, I was trying to add a very slight smoky marble to the floor. I needed the marbling to be small in scale, a small percentage of the overall surface, and zigzagging throughout the floor in a random pattern. I ended up having to use a multi-fractal pattern instead, because the “Marble” texture couldn’t accurately create a marble surface.
Live and learn, I guess.
Posted at 10:19 pm
[ 0 comments ]
| [ Comments Off on Bouncing Ball ]
Recently, PiVisuals posted about the movie Coraline, which is being distributed by Focus Features. Coraline is the first animated movie to be released by Focus Features and they already have a second one slated for later in the year: 9. 9 is a 3D CGI story produced by Tim Burton about rag dolls in a strange, post-apocalyptic setting. Even though the release is still half a year away, they already created a trailer for the movie: http://www.apple.com/trailers/focus_features/9/. It’s tough to tell if the story will be any good, but the animation looks fantastic.
9 was originally a short 10-minute film from 2005 which you can still see on YouTube: http://www.youtube.com/watch?v=DE4qHy0RruA. There is no dialog, but it is well animated and makes the movie seem very promising.
When I was watching Ratatouille the other night, I watched most of the credits because I enjoyed the 2D animation that ran during them. Shortly after the animation ended, I noticed the image to the left scroll by. I knew that Pixar animated everything by hand and did not use motion capture, but I find it interesting that they make it a guarantee. I hope that they stick to their guarantee as an animation studio, because it lends a certain “hand-crafted” charm to their movies that cannot be replaced by motion capture. The animations are actually works of art, as opposed to just virtual representations of data captured from the real world.
Posted at 2:03 am
[ 0 comments ]
| [ Comments Off on The Pixar Guarantee ]
In the past few days, I watched two recent Pixar movies that I have not had a chance to see yet: Ratatouille and WALL-E. Ratatouille wraps up my efforts to see all of Brad Bird‘s movies; I saw WALL-E because it looked to have some great animation from a great studio.
Ratatouille, along with the other Brad Bird movies I watched, was fantastic. It is an excellent story that is well animated and well directed. It might not be as good as The Iron Giant, but I did like this movie better than The Incredibles (not that I have any problem with The Incredibles – it was a really good movie, too). And that fact suprised me — if I guessed in advance which movie I would prefer, one about superheroes or one about a rat that likes to cook, I would have gone with the superhero movie!
Unfortunately, I don’t have such high praise for WALL-E. Although it was very well animated and the 3D work was very beautiful, I could not connect with the story enough to really care about what was happening. I don’t know if it was the fact that the characters were not easily relatable, or if the story wasn’t written well enough to make me interested in the characters, or something else, but I found myself checking my watch and waiting for the end of the movie. I personally blame the story, especially if you contrast this story about robots with The Iron Giant, where you really care about the giant robot by the end of the movie.
On a final note, I really liked the specials available on the Blu-Ray disc for Ratatouille. It has a lot of interviews with Brad Bird and other Pixar staff, a few deleted scenes with commentary, and a couple of extra shorts.
Work has been keeping me pretty busy lately, but I have started a new long-range project to help me hone my 3D modeling skills. I started creating a detailed building exterior. I figure that I can add to the model whenever I have time, and once I have one building done, I can start on another. Eventually, I can have an entire city to use as background shots or even as environments for scenes. Anyway, I’m treating it as a hobby, akin to building model airplanes, except my models are all in the computer!
Although you can’t tell from the image, I have finished three sides of the first floor I’m building. I’m actually creating the building from a reference (anybody recognize it? probably not….), so I need to snap a few photos of the fourth side before I can finish and start stacking floors.
I’ll post some updates once I have something that looks more like a tall building than a floating townhome.
I’ve been playing around with Maya recently and created this simple image to learn basic texturing. The modeling is… well, there wasn’t really any modeling except for creating a few NURBS spheres and a flat plane.
But the textures are my own. I created the one in the top-left first, to try different layering and bump map effects. The green glassy one was a simple dielectric. I’m quite proud of the marble one – I think it looks really good! And I added the last one just to have a very reflective material in the shot.
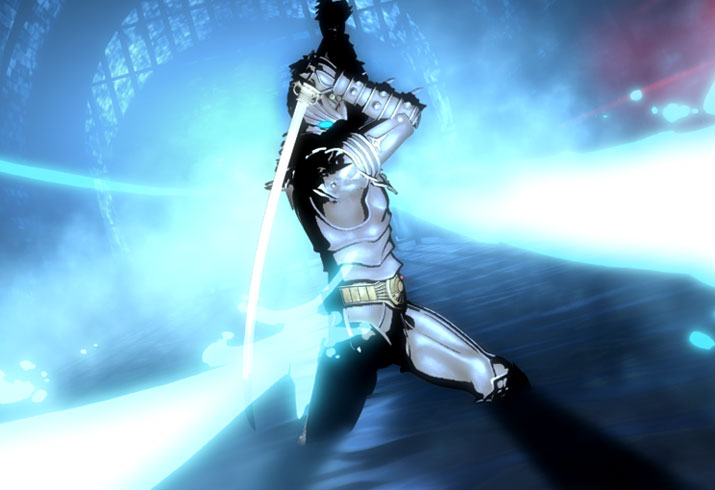
Last night I watched Karas: The Prophecy, an animated OVA. The story is a bit slow and confusing, but the animation and visuals are easily one of the best I have seen in long time. The show uses a combination of 2D and 3D, but takes a much different approach than other animations. Much of the animation is originally 3D-animated, but then drastically altered using 2D techniques to finally achieve the final composition. Wikipedia has a good section on the production of the show, which summarizes the various 2D and 3D techniques used.
This DVD comprises the first half of the full story, which is concluded in Karas: The Revelation. It was actually a six episode OVA, but the U.S. release combined them into two movies. This first DVD is less than an hour and a half long, so they kept the pace moving pretty quickly. If you want to see some amazing animations and fight scenes, add it to your Netflix queue (or try to find it at your local Blockbuster, if you’re still doing things the old way).
There is also an interesting extra feature, which shows several shots in different phases of production, including the initial bone animations (“bones” control a character and his movements), wireframes, render output, and then the final shot after post-processing. I was very surprised by how different the render output and final shot looked; the production team drastically re-worked some of the scenes to create the final look and feel of the movie, which is definitely unique.


 Now that the material is ready, I just assign it to a single polygon and render out the results. As you can see, Maya turned that single polygon into a much more complex piece of geometry during the render. The precision can be controlled using values in the “Displacement Map” section of the object properties (higher sample rates == higher precision). But even with high precision, you will still get some distortion and banding of the original image in the final render if you get too close to the object.